
The Complete Wire Mesh Compost Bin Guide: From $10 Beginner Build to Professional Double-Decker System
Tired of spending $50–$200 on fancy compost bins that still attract rodents, smell bad, or take forever to assemble? Over 14 years of hands-on composting and helping thousands of home gardeners, I’ve discovered wire mesh bins solve nearly every composting frustration—and cost a fraction of commercial options.
What if you could build a highly effective, rodent-resistant compost system in 15 minutes for under $10? Or scale up to a professional 6-foot double-decker system with liquid collection that handles everything from kitchen scraps to woody branches?
This isn’t theory. These are battle-tested designs I’ve refined through real-world urban and suburban composting challenges. Wire mesh bins deliver excellent aeration for fast decomposition, cost almost nothing, and work beautifully even on apartment terraces and small balconies.
In this guide, I’ll show you three complete build options:
• The $10 Beginner Build — 15-minute assembly, perfect for first-time composters and budget builds
• The Hot Composter — hardware cloth system sized for thermophilic decomposition and rodent control
• The Professional Double-Decker — T-post stabilized system with dual chambers and compost tea collection
Each design builds on the same wire mesh principle while addressing different needs and budgets. By the end, you’ll understand the composting science behind why these work, have complete materials lists, and know exactly which system fits your situation.
Let’s start with why wire mesh beats every other composting method.
Why Wire Mesh Composting Beats Commercial Bins: The Science
Before diving into builds, you need to understand why wire mesh works so much better than solid plastic bins or expensive tumblers. This comes down to three scientific principles: thermodynamics, aeration, and accessibility.
The 3×3×3 Rule: Thermodynamics of Scale
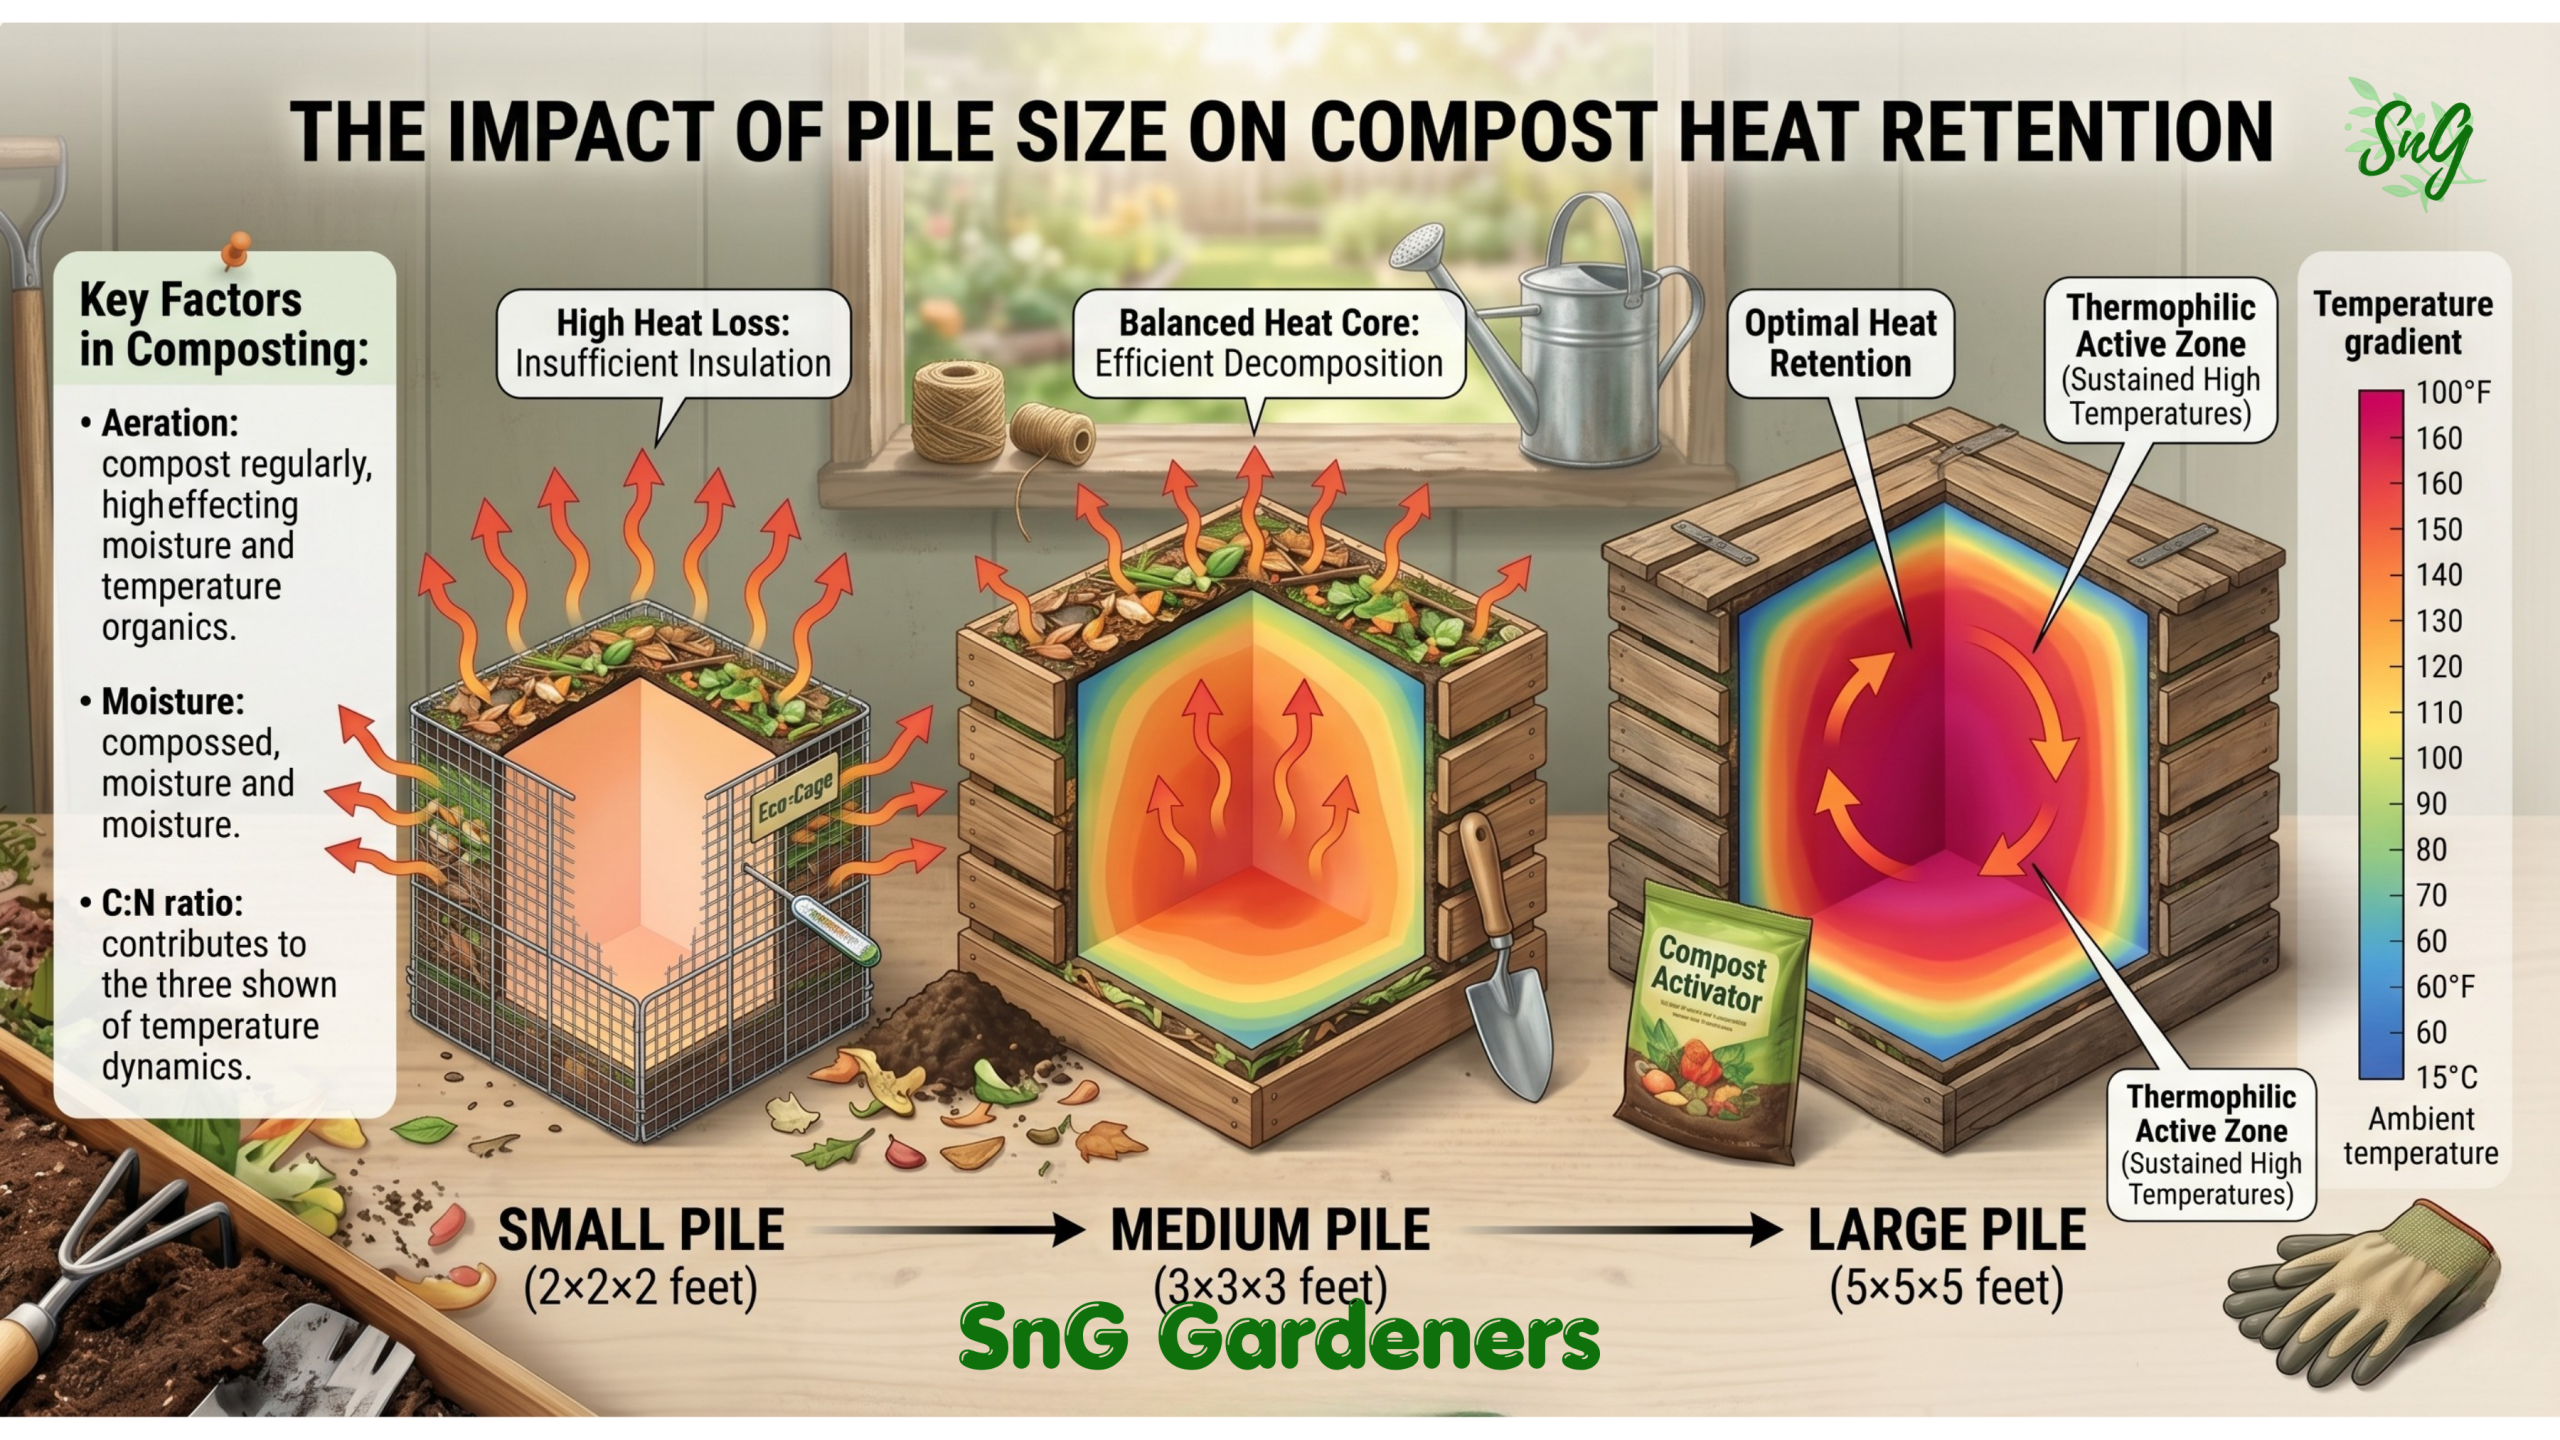
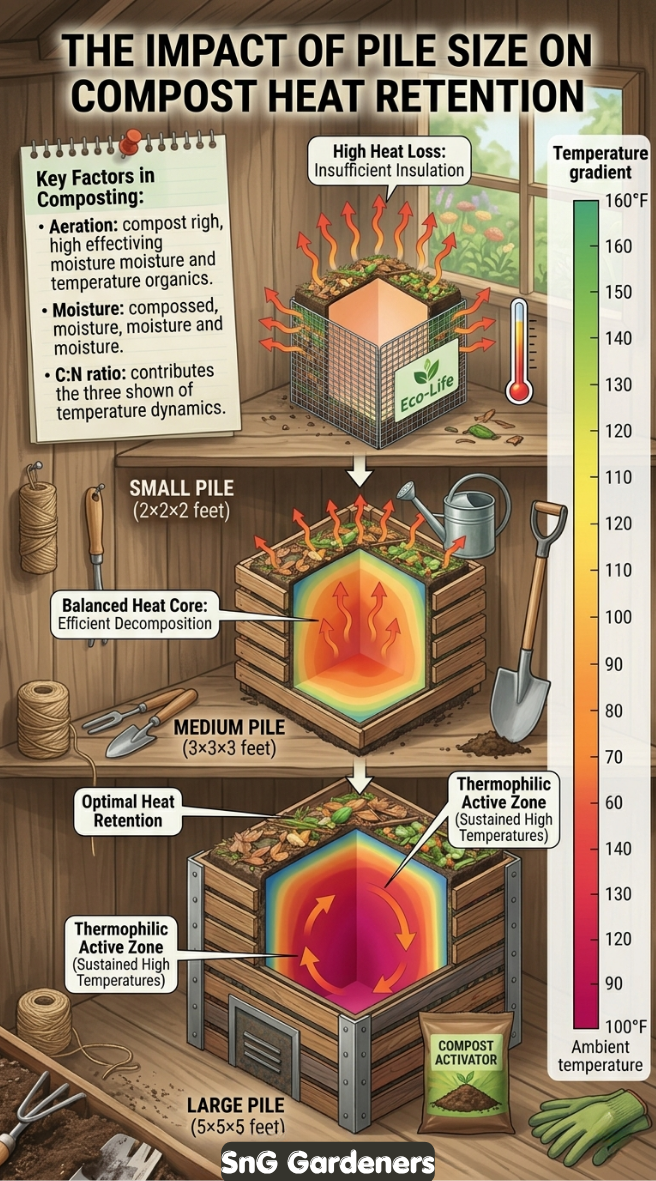
Hot composting—the process that produces finished compost in 2-3 months instead of 6-12—requires reaching thermophilic temperatures between 130°F and 160°F. At these temperatures, heat-loving bacteria work 5 times faster than at lower temperatures, killing weed seeds and pathogens while rapidly breaking down organic matter.
But here’s the critical part: your pile needs enough mass to generate more heat than it loses to the surrounding air. The minimum effective size for hot composting is 3 feet × 3 feet × 3 feet—roughly one cubic yard.
Below this threshold, the surface area to volume ratio is too high. Heat escapes faster than microorganisms can generate it. The pile never reaches thermophilic temperatures, and decomposition stays slow.
Wire mesh bins make it easy to maintain this critical minimum volume while providing the aeration that solid bins can’t match.
Superior Aeration: Why Mesh Beats Plastic
Aerobic decomposition requires oxygen concentrations above 5% throughout the pile. Drop below that threshold, and anaerobic bacteria take over—producing the rotten egg smell that characterizes failed compost bins.
Wire mesh allows passive airflow from all sides. Oxygen naturally diffuses through the mesh as decomposition consumes it. Natural convection currents rise through the pile as it heats, creating continuous air circulation without any manual intervention.
Solid plastic bins trap moisture and block airflow. Even with ventilation holes, they create anaerobic pockets. Tumbler bins—despite being marketed for aeration—often become too wet and compacted because turning doesn’t add oxygen; it just redistributes the existing air.
Wire mesh wins on aeration every time.
| Method | Cost | Setup Time | Aeration | Pest Control | Capacity | Durability |
|---|---|---|---|---|---|---|
| Wire Mesh (Basic) | $10-18 | 15 min | Excellent | Moderate | High | 5-7 years |
| Hardware Cloth | $40-70 | 30-45 min | Excellent | Excellent | High | 10-15 years |
| Plastic Bin | $50-80 | 20-40 min | Poor | Good | Low | 5-8 years |
| Tumbler | $150-300 | 1-2 hrs | Poor | Good | Very Low | 7-10 years |
Accessibility: The Part Nobody Talks About
Wire mesh has one advantage that doesn’t show up in any spec sheet — it completely gets out of your way. When your compost is ready, you just unroll the mesh, set it aside, and the entire pile is right in front of you. Turning takes minutes. Harvesting finished compost from the bottom requires zero tools and zero awkward reaching. Adding fresh material is as simple as lifting the mesh, layering it in, and rolling it back up. No latches, no panels, no fighting the bin when you’re already elbow-deep in garden work. For anyone doing serious volume — multiple batches, frequent turning, regular harvesting — that open access adds up to a real time saving over a full composting season.
Build #1: The $10 Beginner Wire Bin (15-Minute Assembly)
This is where most people should start. If you’ve never composted before, are on a tight budget, or want to test the system before upgrading, this basic wire bin delivers incredible results for minimal investment.
Who This Build Is For
- First-time composters learning the basics
- Budget-conscious gardeners
- Urban apartment dwellers with limited space
- Seasonal composters handling autumn leaves
- Anyone wanting to try composting without major commitment
Complete Materials List (USA Hardware Store Sourcing)
Primary Materials:
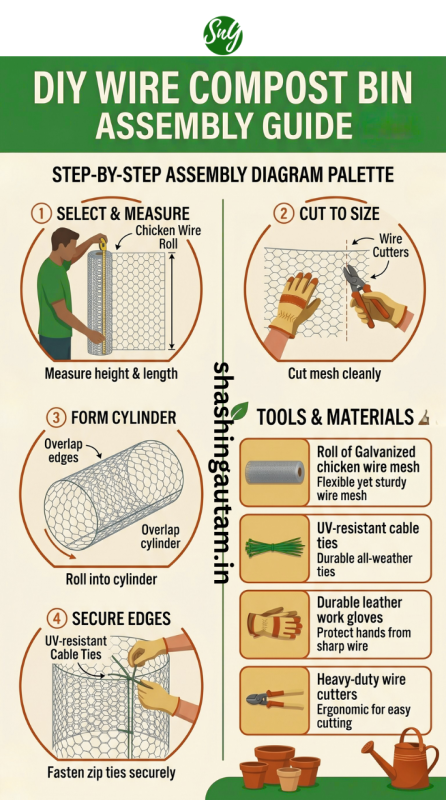
- 10-12 feet galvanized chicken wire (1-inch hexagonal mesh, 36-48 inches tall) — $8-12 at Tractor Supply, Home Depot, Lowe’s
- OR: 10-12 feet welded wire fencing (2×4-inch grid, 36-inch tall) — $10-15
- 12-inch UV-resistant zip ties (package of 50) — $4-6
- Heavy-duty work gloves — $5-8
Optional Upgrades:
- 3-4 wooden or metal stakes (4-5 feet tall) — $8-12
- Wire cutters or tin snips — $10-15
- Metal file for smoothing sharp edges — $6-8
Total Cost: $10-18 (basic) | $25-35 (with stakes and tools)
Step-by-Step Assembly (15 Minutes Total)
Step 1: Measure and Cut the Wire (3 minutes)
Unroll your chicken wire or welded wire on a flat surface—your driveway or garage floor works perfectly. For a 3-foot diameter bin (the minimum for hot composting), cut 10 feet of wire. For a slightly larger 4-foot diameter bin, cut 12.5 feet.
Safety note: Cut wire ends can be extremely sharp. Use heavy-duty wire cutters or tin snips, and always wear thick work gloves. After cutting, use a metal file to smooth any protruding wire ends—this takes 30 seconds and prevents nasty scratches later.
Step 2: Form the Cylinder (5 minutes)
Stand the wire upright and gently bend it into a circular shape. Don’t worry about perfect symmetry—close enough is fine. The key is overlapping the ends by 6-8 inches. This overlap creates a strong, self-supporting structure that won’t spring open when filled with compost.
If your wire wants to spring back to its rolled shape, have a helper hold one end while you form the circle. Once overlapped, the tension actually helps keep it together.
Step 3: Secure the Seam (5 minutes)
You have three options for fastening the seam:
- UV-resistant zip ties (easiest): Thread a zip tie through the mesh every 6-8 inches from top to bottom. Pull tight and trim the tail. Use heavy-duty 12-inch ties, not cheap indoor ones that will crack in sunlight within months.
- Twist wire ends (free if using chicken wire): Bend the cut wire ends back on themselves, hooking through the opposite side. This creates a latch-like connection. Works well but takes longer and requires pliers.
- Baling wire or heavy wire ties: Cut 6-8 short pieces and twist them around the overlap points. Very durable but requires wire cutters and pliers.
Test your work: grab the cylinder and try to pull the seam apart. It should feel rigid with no wobbling. If it flexes too much, add more zip ties or wire connections.
Step 4: Position and Optional Staking (2 minutes)
Choose your location wisely. You want:
- Level ground — prevents tipping
- Good drainage — no standing water
- Partial shade — full sun dries out the pile; full shade slows decomposition
- Convenient access — from both kitchen and garden
Simply place your cylinder in position. The weight of compost materials will hold it in place.
If you’re in a very windy area or want extra stability, drive 3-4 stakes into the ground just inside the cylinder perimeter, spacing them evenly. Push them down about 18 inches. This prevents the bin from being knocked over by strong winds or curious animals.
That’s it. Your bin is ready to fill. Total time: 10-15 minutes.
The ‘Lift-and-Turn’ Technique: Easiest Compost Aeration Ever
Here’s where wire bins really shine over every other composting method: turning your pile is absurdly easy.
With solid bins or wooden pallets, turning means digging everything out with a pitchfork, mixing it, and putting it back. Exhausting. Time-consuming. Most people skip it.
With wire bins, you literally lift the cylinder off the pile, move it two feet away, and fork the material back in. Takes 5 minutes. Perfect aeration every time.
Here’s the technique:
1. If you used zip ties, cut them along one vertical line (saves 30 seconds vs. cutting every tie)
2. Unfasten or simply lift the wire cylinder straight up—it’s surprisingly light
3. Move it 2-3 feet away from your compost pile
4. Position the empty cylinder in its new spot
5. Use a pitchfork to toss material from the old pile into the cylinder—outer material goes to the center, center material to the edges
6. Re-secure the seam with fresh zip ties (10 ties costs maybe $1)
This redistributes moisture, adds oxygen throughout, moves cooler edge material to the hot center, and takes less time than loading a tumbler.
Do this every 1-2 weeks during active composting. You’ll notice the pile heating up again within 24-48 hours as fresh oxygen fuels the thermophilic bacteria.
The Hardware Cloth Hot Composter (Rodent-Proof System)
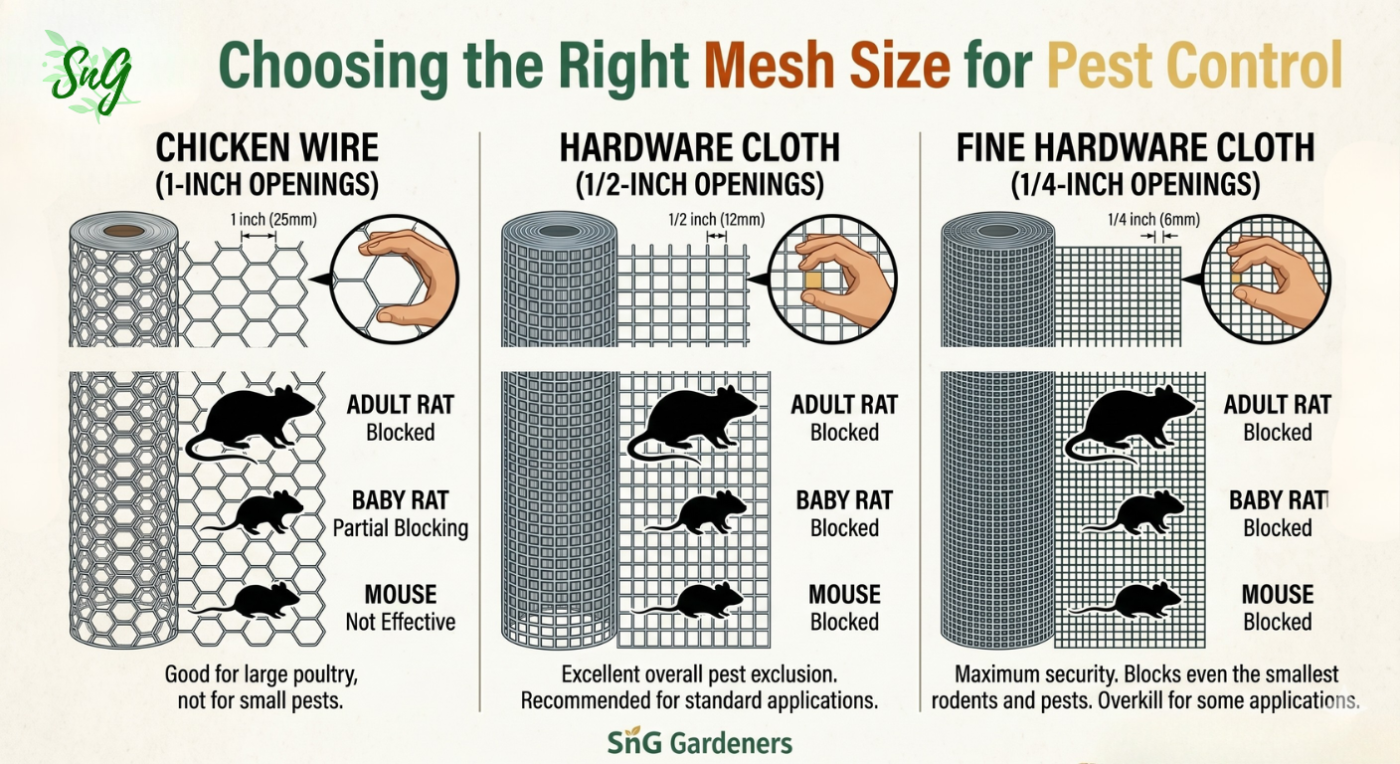
If you face rodent pressure, want faster decomposition, or are ready to invest in a longer-lasting system, upgrade to hardware cloth. This build uses 1/2-inch or 1/4-inch galvanized mesh—small enough to block even baby mice while still providing excellent airflow.
Why Upgrade to Hardware Cloth?
- Rodent-proof: 1/2-inch mesh blocks mice; 1/4-inch mesh blocks everything including baby rats
- Better structure: Stiffer material holds shape without stakes
- Professional appearance: Looks intentional, not improvised
- Longer lifespan: 10-15 years vs. 5-7 for chicken wire
- Supports taller bins: Can build 4-5 feet tall without sagging
Complete Materials List & USA Sourcing
Core Materials:
- 12.5 feet of 1/2-inch galvanized hardware cloth (36-48 inches tall) — $25-35 at hardware stores
- OR: 1/4-inch hardware cloth for maximum rodent protection — $35-50
- UV-resistant cable ties or galvanized wire — $5-8
- Wire cutters, metal file, heavy work gloves — $15-20 (if not already owned)
Optional Enhancements:
- 4×4 foot piece of 1/4-inch hardware cloth for bottom barrier — $15-20
- Concrete blocks or bricks for base elevation — $10-15
- 4-6 metal stakes for extra stability — $12-18
Total Cost: $40-70 (basic) | $65-95 (with all enhancements)
The 3×3×3 Sweet Spot: Building for Thermophilic Conditions
Remember the thermodynamics principle from earlier? You need minimum 3×3×3 feet to reach hot composting temperatures. Here’s how to achieve that with hardware cloth:
The Math:
- Circumference = π × diameter
- For 3-foot diameter: 3.14 × 3 = 9.4 feet of wire needed
- Add 6-8 inches overlap = 10 feet total minimum
- For 4-foot diameter: 12.5 feet (recommended—gives you ~3.5 cubic yards)
Larger is better for heat retention, up to about 5×5×5 feet. Beyond that, you’re just spending more on materials without gaining composting speed.
Advanced Assembly: Edge Treatment & Safety
CRITICAL Safety Step: Filing Sharp Edges
Hardware cloth is stiffer than chicken wire, which makes it structurally superior but also more dangerous when freshly cut. Every cut edge leaves razor-sharp wire points that will shred your skin and gloves.
Two methods to neutralize sharp edges:
Method 1 – Filing (recommended):
Cut your hardware cloth flush to a cross-wire intersection. This gives you the cleanest cut possible. Then use a metal file to smooth each protruding wire point. Takes 2-3 minutes and makes handling safe. File in one direction—toward the mesh, not away from it.
Method 2 – Folding (for chicken wire only):
Chicken wire is flexible enough to fold back 3-4 inches along the cut edge. This creates a rolled hem that’s safe to handle. Hardware cloth is too stiff for this—filing is your only option.
Never skip this step. I’ve seen too many gardeners get nasty cuts from rushing through assembly.
Bottom Barrier: The Complete Rodent-Proofing System
Mesh sides alone aren’t enough if you have serious rodent pressure. Mice and rats will burrow underneath and come up inside your bin. Here’s how to block them completely:
Method 1: Underneath Barrier (Maximum Protection)
Lay a 4×4 foot piece of 1/4-inch hardware cloth flat on the ground before positioning your cylinder. The bin sits directly on top. Rodents can’t burrow through 1/4-inch mesh—they’ll give up and go elsewhere.
Secure the edges with landscape staples or heavy rocks to prevent rodents from pushing underneath from the sides.
Cost: $15-20. One-time expense. Lasts 10+ years.
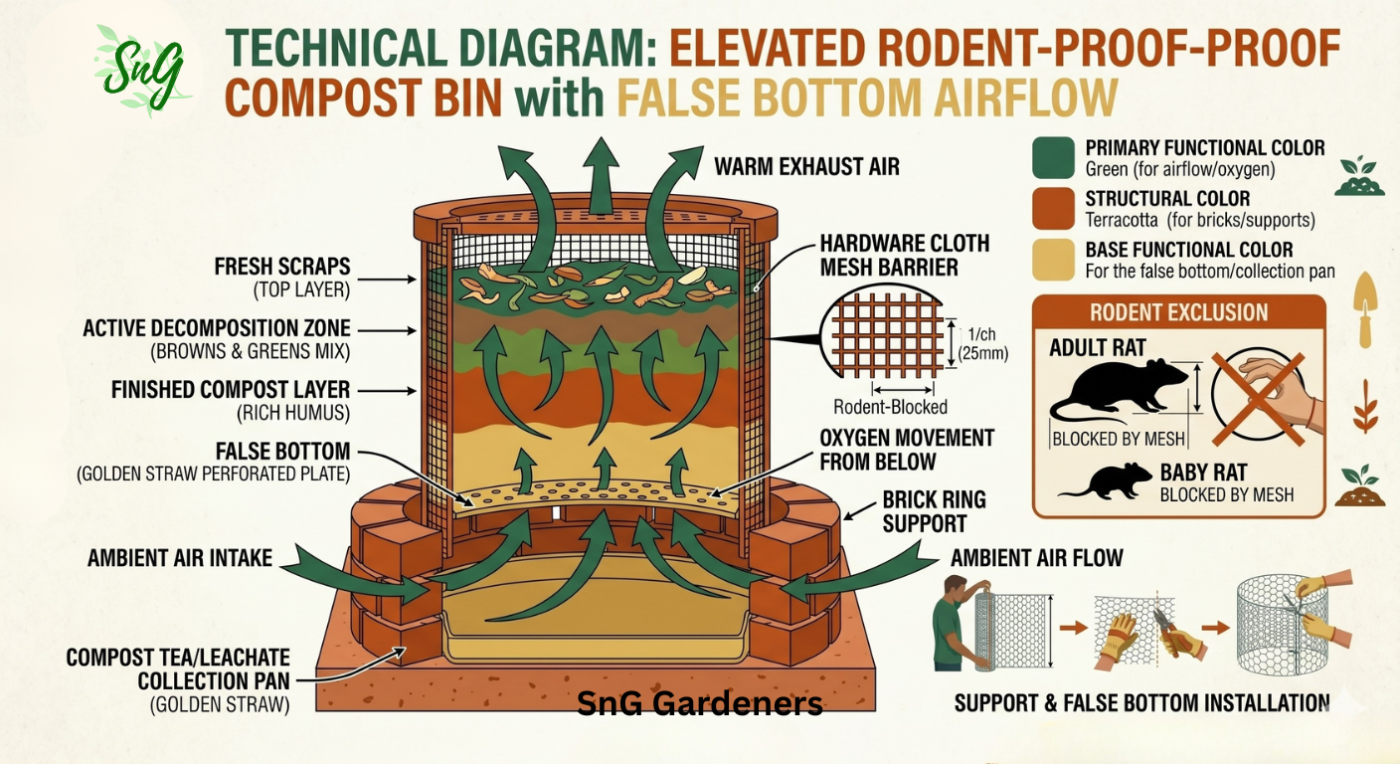
Method 2: False Bottom with Airflow (My Preferred Approach)
This method adds pest protection AND improves composting by creating air circulation from below:
1. Elevate your bin on 4-6 concrete blocks or bricks arranged in a ring (not a solid floor)
2. Leave 6-inch clearance underneath
3. This creates air pockets that let oxygen flow up through the pile from below
4. Also creates space for leachate drainage—place a collection tray underneath if desired
5. Rodents can see through the gaps and won’t burrow where they feel exposed
This solves both aeration and pest problems simultaneously. It’s the foundation for the professional double-decker system we’ll cover in Build #3.

SnG Gardeners has 14+ years of hands-on home gardening experience growing food in containers and small spaces. He runs shashingautam.in and the YouTube channel "Shashi N Gautam Kitchen Gardeners" (163,000+ subscribers), where every technique and recommendation comes from real-world testing — not theory. When SnG writes about a method, it's one he's used, tracked, and would use again.
Beginner Gardening Made Simple: Containers, Compost, Seeds & Organic Pest Control
Growing vegetables and fruits in pots, made simple: soil basics, compost, easy crops, and organic pest fixes for first-time gardeners.
All
The Complete Wire Mesh Compost Bin Guide: $10 Basic to Pro Double-Decker System
All
Stop Throwing Away Branches! 3 Easy Ways to Compost Woody Waste Without a Shredder
All
How to Make Compost Faster at Home: The Proven 2–3–4 Method That Actually Works
All
One Simple Trick to Save Your Terrace Garden This 45°C Heatwave
All
Planting seedlings in containers
All
When Do Seedlings Need Fertilizer? Beginner’s Guide
All
Essential Gardening Tools for Beginners: Complete Guide 2025
All
🌱 Plan Your First Garden – Easy Crops for Beginner Success! 🌱
All
Complete Home Vegetable Gardening Course – Soil – The Foundation of Growth
All
Stop Killing Your Broccoli Seedlings! Easy Fix for Beginners
All
How to Grow Blueberries in Pots in India – Best Varieties, Chill Hours & Care Tips
All
How to Grow Strawberries in Pots — Complete Guide for Home Gardeners
All Plant Disease and Pests
Yellowing of Leaves in Plants: The #1 Hidden Reason (Not Pests, Not Nutrients!)
Plant Disease and Pests
Is Mosaic Virus or Leaf Curl Virus in Plants Treatable?
All organic seeds
High Yeild Quality Capsicum Seeds for Home Garden
Growing Mango In Pot गमले में फ्रूट्स उगाये
A Beginner’s Guide to Buying the Perfect Grafted Mango Plant
All गमले में फ्रूट्स उगाये
Pusa Plant Nursery – New Delhi
All Gardening Video organic fertilizers
Is Charcoal Good for Plants and Soil? The Complete Honest Answer
All organic fertilizers
How to Make Organic Liquid Fertilizer from Mustard Cake — 5x More Potent
All
Big Pots vs Good Soil: Which Wins?
Gardening Video
मिर्ची / चिली उगाए कैसे – ये 2 गलती कभी न करे
All Gardening Video गमले में फ्रूट्स उगाये
बिगिनर गाइड: अमरूद गमले में कैसे उगाये?
organic Insecticide Plant Disease and Pests
Mealybugs on Hibiscus: Organic Spray That Kills Every Life Stage
All Plant Disease and Pests
Powdery Mildew Control
Gardening Video Plant Disease and Pests
How to Get Rid of Leaf Miners Naturally (5 Organic Methods That Work)
Gardening Video Tips & Tricks for Growing Fruits in Home Garden
Can a Papaya Plant Grow in a Pot & produce Fruit? Video (Hindi)
Customers
Gardening Success Shared By Our Fellow Gardeners
Gardening Video Tips & Tricks for Growing Fruits in Home Garden
5 Amazing Tips For Growing Strawberries at home -Video (Hindi)
Gardening Video Tips & Tricks for Growing Fruits in Home Garden
Secret of Growing Bigger Strawberries -Video (Hindi)
Growing vegetables from seeds
Tips for growing vegetables from seeds at home